# Building a Github Repo Template Part 1: Next.js, React, and TypeScript
I'm finding myself needing to spin up a new project for a quick experiment and cringe at the thought of setting up my "Go To" tech stack from scratch for the Nth time. Luckily, Github has [introduced template repositories](https://docs.github.com/en/github/creating-cloning-and-archiving-repositories/creating-a-repository-from-a-template) and I think it is time to make one.
In this series of posts, I'll document the creation of the repository template. It will be fairly opinionated for my tech stack of choice as well as follow how I strategically set things up.
**The Stack Covered in this Series**
- [Node](https://nodejs.org/en/) 12.16.1 with NPM (6.13.4)
- [Typescript](https://www.typescriptlang.org/) 3.9.6
- [React](https://reactjs.org/) 16.13.1
- [Next.js](https://nextjs.org/) 9.4.4
- [Material-UI](https://material-ui.com/) 4.11.0
- [ESLint](https://eslint.org/) 7.4.0
- [Jest](https://jestjs.io/) 26.1.0
In this post, I will walk through setting up the base stack of React and Next.js with TypeScript.
**Just want the Code?**
[View the full changeset in this Github PR](https://github.com/blainegarrett/react-next-material-typescript-template/pull/1/files) or check out the [0.0.1 release of the repository](https://github.com/blainegarrett/react-next-material-typescript-template/releases/tag/0.0.1).
## Initial Setup
### Prerequisites
If you are following along:
1. Make sure [Node](https://nodejs.org/en/download/) is installed. I am running v12.16.1. Check this by running `node --version`.
1. Create a new [Github Repository](https://github.com/new) and check it out or simply create a new working directory for your project.
1. In your working directory, run the following in the terminal
```
npm init
```
Answer the questions. The defaults are usually fine. This will create a *package.json* in your working directory and make it your project root. Note: You can manually change the values entered in this step later by editing the *package.json*
### Install Next.js and React
Simply run the following in the terminal to install the core Next.js and React
```
npm install next react react-dom
```
I tend to like the consistency of running `npm run dev` to start my application across projects so I'll modify the "scripts" section of the *package.json* to be the following:
```
"scripts": {
"dev": "next",
"test": "echo \"Error: no test specified\" && exit 1"
},
```
To start the application, run the following in the terminal
```
npm run dev
```
This should produce the below error because I have no pages yet for Next.js to render.
```
ready - started server on http://localhost:3000
Error: > Couldn't find a `pages` directory. Please create one under the project root
...
```
### Creating The First Page
Next, I will create a simple page to have some code to work with to ensure the setup is good to this point. Note: That I am not using TypeScript yet, so I'll have to rename/modify this file later.
In the project root create */pages/index.jsx* and add the below content.
```
import React from 'react';
const IndexPage = (props) => {
let {greeting} = props;
return (
{greeting}👋
);
}
export async function getStaticProps() {
return {
props: {
greeting: 'Hello Next.js',
},
}
}
export default IndexPage;
```
Now when I run `npm run dev` in the terminal, I see:
```
ready - started server on http://localhost:3000
```
Opening the browser to http://localhost:3000, produces:

Next.js and React have successfully been installed. Celebrate.
**Note:** I added the call to the Next.js `getStaticProps()` method to illustrate passing props to a page, which will help us in later steps with TypeScript. Read more on [getStaticProps](https://nextjs.org/docs/basic-features/data-fetching#getstaticprops-static-generation)
## Introduce TypeScript
Next.js works really well with TypeScript. To get started, I simply need to create an empty tsconfig.json file in the project root by running `touch tsconfig.json` in the terminal.
Next run `npm run dev`, Next.js will produce a warning like:
```
ready - started server on http://localhost:3000
It looks like you're trying to use TypeScript but do not have the required package(s) installed.
Please install TypeScript, @types/react, and @types/node by running:
npm install --save-dev typescript @types/react @types/node
```
As the message says, I need to install some things. To install these dev dependencies, simply run the following in the terminal:
```
npm install --save-dev typescript @types/react @types/node
```
Running `npm run dev` now produces a message like:
```
We detected TypeScript in your project and created a tsconfig.json file for you.
Your tsconfig.json has been populated with default values.
```
Next.js detected I want to use TypeScript and auto populated the *tsconfig.json* with some sane defaults specifically for working with Next.js, React, etc. If you are following along, feel free to open the *tsconfig.json* file and see the settings.
## Convert The Next.js Page to TypeScript
Next I'll convert the page I created in previous steps to be written in TypeScript.
First, rename the `pages/index.jsx` file to `pages/index.tsx`. Based on the generated *tsconfig.json*, this will tell Next.js to interpret the syntax as TypeScript. When reloading the page, it should still work fine even though I have not written any TypeScript yet. This is due to the fact vanilla JavaScript is valid TypeScript code.
Next, I'll update the syntax of the `/pages/index.tsx` to add typings. Below is the modified TypeScript friendly version of the page with all the types overly explicit.
```
import React from 'react';
import {GetStaticProps, NextPage, GetStaticPropsContext, GetStaticPropsResult} from 'next';
interface IndexProps {
greeting: string
}
const IndexPage:NextPage = (props: IndexProps) => {
let {greeting} = props;
return (
{greeting}👋
);
}
export const getStaticProps: GetStaticProps = async (context: GetStaticPropsContext): Promise> => {
return {
props: {
greeting: 'Hello Next.js',
},
}
}
export default IndexPage;
```
Opening the browser to http://localhost:3000, gives the rendered result:

TypeScript is installed and working great. Celebrate.
*Note:* I tend to be verbose with my typings and try to avoid inferred types where possible. This is personal choice, but I find it helps me understand the typings a lot better especially when I need to extend types.
## Building and Running Build
The final step for this part of the series is to ensure I can create a production build of the application.
First, modify the "scripts" section of *package.json* to include the following `build` and `start` scripts.
```
"scripts": {
"dev": "next",
"build": "next build",
"start": "next start -p 8080",
"test": "echo \"Error: no test specified\" && exit 1"
},
```
Then simply run
```
npm run build
```
This will produce output similar to:
```
Creating an optimized production build
Compiled successfully.
Automatically optimizing pages
Page Size First Load JS
┌ ● / 312 B 59 kB
└ ○ /404 3.25 kB 61.9 kB
+ First Load JS shared by all 58.7 kB
├ static/pages/_app.js 983 B
├ chunks/9eed07401741a3ab5c0a6c880a8e90d00a232a3c.36a881.js 10.7 kB
├ chunks/framework.c6faae.js 40 kB
├ runtime/main.99661a.js 6.28 kB
└ runtime/webpack.c21266.js 746 B
λ (Server) server-side renders at runtime (uses getInitialProps or getServerSideProps)
○ (Static) automatically rendered as static HTML (uses no initial props)
● (SSG) automatically generated as static HTML + JSON (uses getStaticProps)
```
Looking at the contents of the `/.next` folder, I see the above file structure. Next.js has compiled the TypeScript/React pages into vanilla Javascript that can now run with Node natively.
Lastly, I need to run the built application. I can do this by running the following in the terminal:
```
npm start
```
ready - started server on http://localhost:8080
Opening http://localhost:8080 in the browser, I can see I am now running the production build.

Celebrate.
## Commit and Designate as Template Repo
I'm done making code changes for the purpose of this part of the series. I have one final step, and that is to designate the Github Repository as a Template.
From the repository on Github, click on the Settings tab and select the checkmark next to "Template Repository" under the field to change the name.

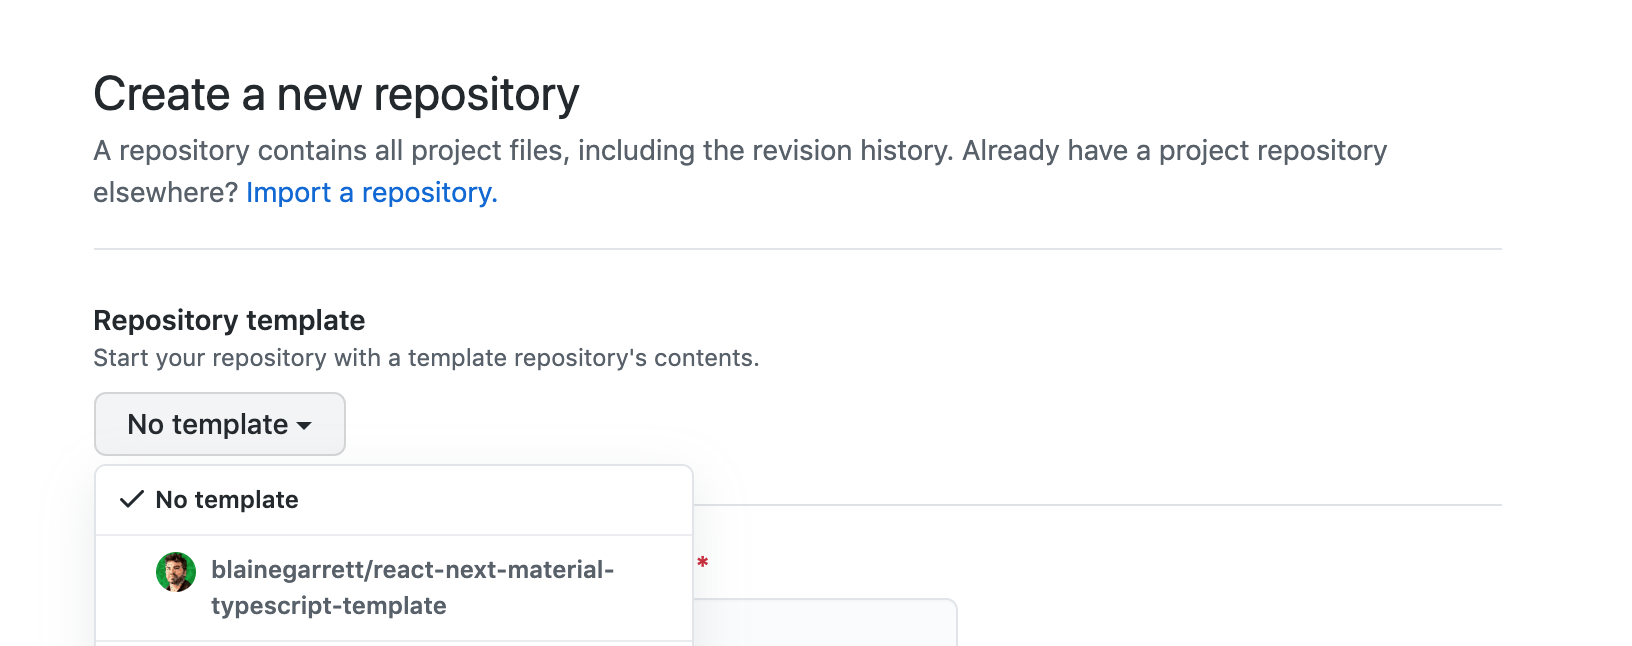
Once saved, the repository will now be available as a template to Create New Github Repository interface.
## Closing Thoughts
I've set up a basic Next.js project written in TypeScript. [Here is a Github pull request covering all of these changes in this post](https://github.com/blainegarrett/react-next-material-typescript-template/pull/1/files) or check out the [0.0.1 release of the repository](https://github.com/blainegarrett/react-next-material-typescript-template/releases/tag/0.0.1)
In the [next post in the series](https://hashnode.blainegarrett.com/building-a-github-repo-template-part-2-eslint-with-typescript-ckcnxtgm000aekls112id1qv7), I will set up ESLint with VSCode to make sure the code is clean and also get the benefit of auto formatting, which I love.
Image Credit: "[Nectarines](https://www.flickr.com/photos/53822756@N00/35655743155)" by [animakitty](https://www.flickr.com/photos/53822756@N00) is licensed under [CC BY-NC-ND 2.0](https://creativecommons.org/licenses/by-nc-nd/2.0/).